
Showing posts with label DIY. Show all posts
Showing posts with label DIY. Show all posts
1.14.2010
Lauren & Jon's Escort Card Box- DIY!
Want to learn how to make this super rustic, earthy, escort card box that our January Featured Couple Lauren & Jon used for their vineyard wedding? Janie has a great DIY tutorial over at The Bride's Cafe today... go check it out!


11.11.2009
DIY Mossy Monogram via The Bride's Cafe


4.22.2008
Feel Good... Go Green
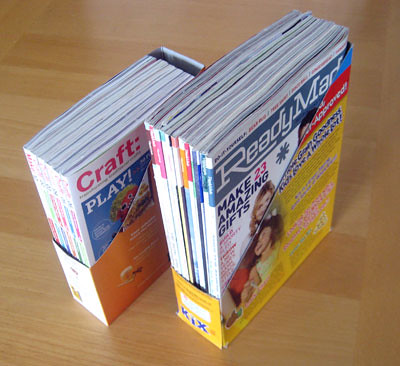
Happy Earth Day! It's true, green is the new black... and going green is easier than you might imagine. One of the simplest things you can do... reuse things you already have. Take a tip from RePlayGround and use your old cereal boxes to create a magazine holder for all those wedding magazines you have piled up around your house- super cute, creative, and best of all GREEN! Want to try creating these? Complete instructions can be found here.
6.26.2007
Calendar Guestbook
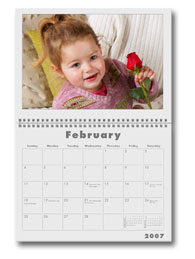 I loved our Polaroid Guestbook that we did for our wedding- it was very interactive and much better than the typical "sign your name on the line" guestbook. If you're looking for another unique guestbook ideas check this one out:
 Create a Photo Calendar that starts in the month you get married. Have your guests sign anywhere they'd like on the calendar- maybe on their own anniversary or birthday. Then you have a full year of reminders of special dates and events and each month you can have fun reading all the messages from your guests!
6.22.2007
DIY Polaroid Guestbook

Our guests raved about the polaroid guest book we did. They loved having their picture taken as soon as they arrived at the reception (I guess it made them feel important!) and they really enjoyed being able to write us a message rather than just signing their name. So how'd we do it? It was actually really simple, and cheap! Below are the directions:
Materials:
- Scrap book (I purchased a small 5x7" scrapbook from ACMoore for $3- make sure to get a book that has the page covers that are closed at the bottom so that if any of the photos come loose they won't get lost)
- extra scrapbook pages (also at ACMoore)
- photo corners (purchased at ACMoore)
- 2 Polaroid JoyCams (purchased off ebay)
- JoyCam film (purchased off ebay)
How it Worked:
We had three guestbook attendants. Two attendants took photos as the guests entered cocktail hour at the reception, which helped to keep things moving. With two photographers, no one had to wait for very long. The third attendant was seated at the guestbook table and was responsible for attaching the photos to the pages with the photo corners and making sure that people signed next to their photos. Once each page had two photos and two messages, the attendant at the table just inserted the scrapbook page into it's cover and voila! The guestbook was finished before we even arrived at the reception! Simple, easy, cheap, and much more fun to look back on instead of just a book with names!
6.10.2007
Bling for your Bouquet

Looking to add a little bling to your bouquet? I came across these easy instructions by a former knottie Jen2Wed to make your own bouquet jewels. This is a very simple DIY project that can save you a ton of cash. Check out these great step by step instructions:
Material Needed (Purchased from Michaels):
~ Beads of choice. Various sizes, shapes and colors.
~ Pins (not sharp!), approximately 2” long, flat top, found in the bead section.
~ Superglue or Tacky Glue
~ Floral Wire - Found in Floral Section. Cut down to approximately 6” sticks.
~ Floral Tape - Found in Floral Section
Material Needed (Purchased from Michaels):
~ Beads of choice. Various sizes, shapes and colors.
~ Pins (not sharp!), approximately 2” long, flat top, found in the bead section.
~ Superglue or Tacky Glue
~ Floral Wire - Found in Floral Section. Cut down to approximately 6” sticks.
~ Floral Tape - Found in Floral Section
Step 1: Stack the beads on the pin in any combination you like.
Glue the bottom bead in place to keep the beads from falling
down the pin.
Glue the bottom bead in place to keep the beads from falling
down the pin.
Step 2: Superglue the pin to the floral stick, make sure the floral stick is just
below the beads so there is more of a flush look.
below the beads so there is more of a flush look.
Step 3: Once the glue dries, cut off about 5-6” of floral tape
and an angle at the ends, wrap the pointy part of the
end at the bottom of the beads and twist around so it
covers it. Twist the floral tape down the stick, if you
get it at the right angle the tape will not wrinkle.
and an angle at the ends, wrap the pointy part of the
end at the bottom of the beads and twist around so it
covers it. Twist the floral tape down the stick, if you
get it at the right angle the tape will not wrinkle.
Step 4: Finish the ends off with a drop of Tacky Glue to keep
the ends from coming apart.
the ends from coming apart.
Step 5: Insert into your bouquet!
Don't feel like being crafty? You can always opt to order pre-made bouquet bling from bouquetjewels.com.
Subscribe to:
Posts (Atom)